Another post, another mad-capped project for The Collector.

A few years ago, Hornby imported the Lionel-made "Hogwarts Express" gauge 2 train sets. I reviewed a set for Garden Rail, re-gauged it (with difficulty and a lot of swearing), and speculated that Hornby could have used it to kick-start an imported range of large-scale toy sets. For anyone who's bothered, they can wade back through the blog archive, assuming anyone reads this ridiculousness.

Having written the first part of the Collector article, on the history of the large-scale efforts and the Hornby/Lionel set, I'd always planned a part 2, with the development of this range that might have happened, and it what it could have looked like.

These sets don't look to have been massively popular; you can get them clearance pretty cheap, or indeed often stupidly cheap second-hand after being used once or twice. I've been buying them up when I spot them (I have a grand plan for a model railway layout using this stuff as a basis... what can I say, a gauge with next to no commercial support? I love a challenge).
I set myself some ground rules for this project. The main one was: no rebuilds, just repaints of existing items (assuming Hornby would have wanted to keep the budgets tight in reality).
Re-painting.
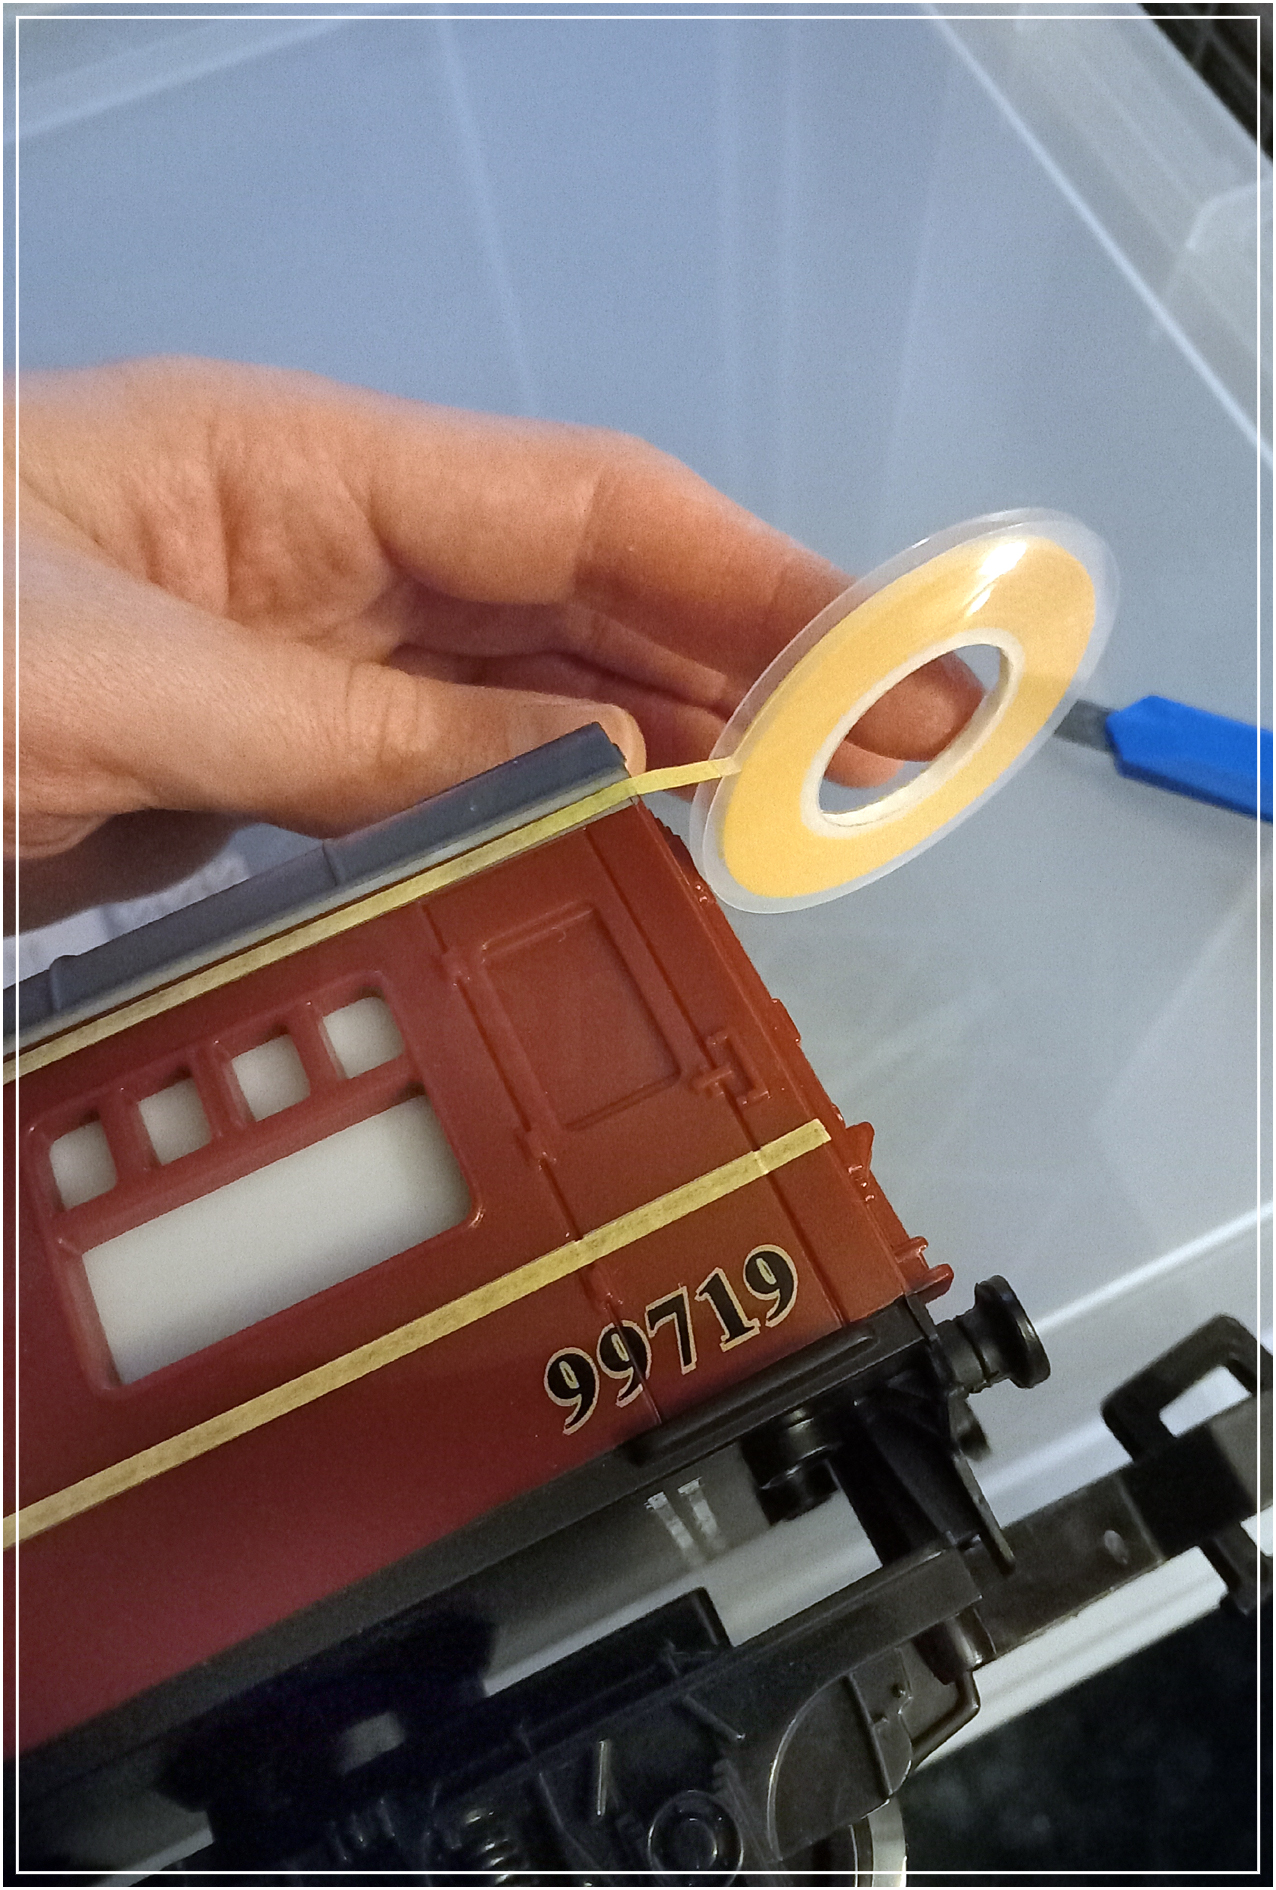
It was easiest to start with the coaches; I knew I wasn't going to be able to recreate the lining, so thought I'd try masking it off. Tamiya masking tape in a mix of 2mm or 3mm width used mainly.

Generally it worked quite nicely.

Alongside the Hogwarts set, the only other UK-outline train in the Lionel 'Ready to Play' range is Thomas. Whilst Hornby would be unlikely to buy the licence for Thomas the Tank Engine again, I thought some repaints would give the line a British tank loco and coach. I bought a few sets back when the pound was better against the dollar, pre-war.

Lionel don't tend to make these easy to re-gauge, but at least you can dismantle the models reasonably easily. Later RTP items tend to be glued together, Lionel not being keen on modellers monkeying about with their products.

Here I'd break my 'no rebuild' rule, though to be fair Hornby/Lionel would also need to re-tool a smokebox door to replace the face on the loco.

All the rest of the sets are US-outline, which meant some re-painting into British colour schemes would be the only option. I got this set off eBay, from a seller in Brighton of all places; this set isn't generally available here in the UK.

Dismantling for spraying.

The models with a coat of primer; they all got at least one coat of grey. For real stress, I'd suggest also trying to spray-paint models during a wet, windy winter, with a deadline fast approaching.

Cleaning the over-spray (caused by, yes, spraying during a breeze) will be a fun job for Future Ben.

With the spraying done, it was time for some detail painting; simple touches, using Citadel acrylics.

All the colour schemes were simple, and I deliberately used a restricted palette of colours over my range, trying to reflect what Hornby/Lionel might have done in reality.

Loco with decals; the plan was to make stickers, but in the end I printed on gloss and glued the custom-designed elements on. Incidentally, the repaint of the 0-6-0 was based on the slightly smaller toy, itself a re-brand of a Thomas toy sold commercially about 20 years ago.
Photographing the models

I was planning on photographing the models on a custom-built set , but quickly realised there'd be no time to build it, and finish the rolling stock models, so dug out an existing photoplank from the loft.

Originally designed for G scale track to be laid on top, unballasted, I cut a channel in the grass, sprayed on some textured spray paint for ballast, and glued-down some of the RTP gauge 2 track, which had a spray of brown paint to lift it from being plain black.

I thought I'd like to shoot some of the pics outside, but the sheer number of models meant I'd need to work at home, which meant using the garden wall. Lighting was a bit poor.

It kind of worked, but I quickly realised I'd need to do a studio shoot.

Back indoors, with a borrowed studio light, my blue sky backdrops, and some white acrylic sheet.

The plan was to use this as the basis for some of the photo-shoppery...

...like this, a faked website pic in Hornby's current style.

Also this sort of thing, to create...

...fake catalogue pages, in the style Hornby used a few years ago.

Then it was out with the hanging basket liner, with some Britains figures and plastic trees for set dressing.

Oh we do like to be beside the seaside...

When I was drawing up the plans for this project, we were on holiday at Minehead, where the station is on the promenade.

So, there's always been a thread of 'trains to the seaside' running through this project. I had an idea of doing a fake boxed train set, so the 'Holiday Express' seemed like a bright, colourful sort of a thing to do, and an antidote to the grim winter I was working in.

Oh look, it's the Holyhead Breakwater set again! It had been stored up in the loft, and the winter hadn't been kind to it. The sand had absorbed damp at some point, and the 00 gauge rails rusted, so I thought I'd be best off lifting them altogether.

The beach set was very improvised on the day; the rippled water is textured, clear sheet bought for another project, and laid on our exuberant, tropical-themed tablecloth with some real sand. The waves came from the cotton stuffing from some incopads (the same ones used to do the snow for that Polar Express comic at Christmas; hooray for upcycling).

More Britains figures- in another example of upcycling, they're the ones modified for the seaside miniature railway 'cakebox' build from about three or four years ago.

I drew up some simple beach elements, coloured with alcohol markers, to use with the box art.

Like so.
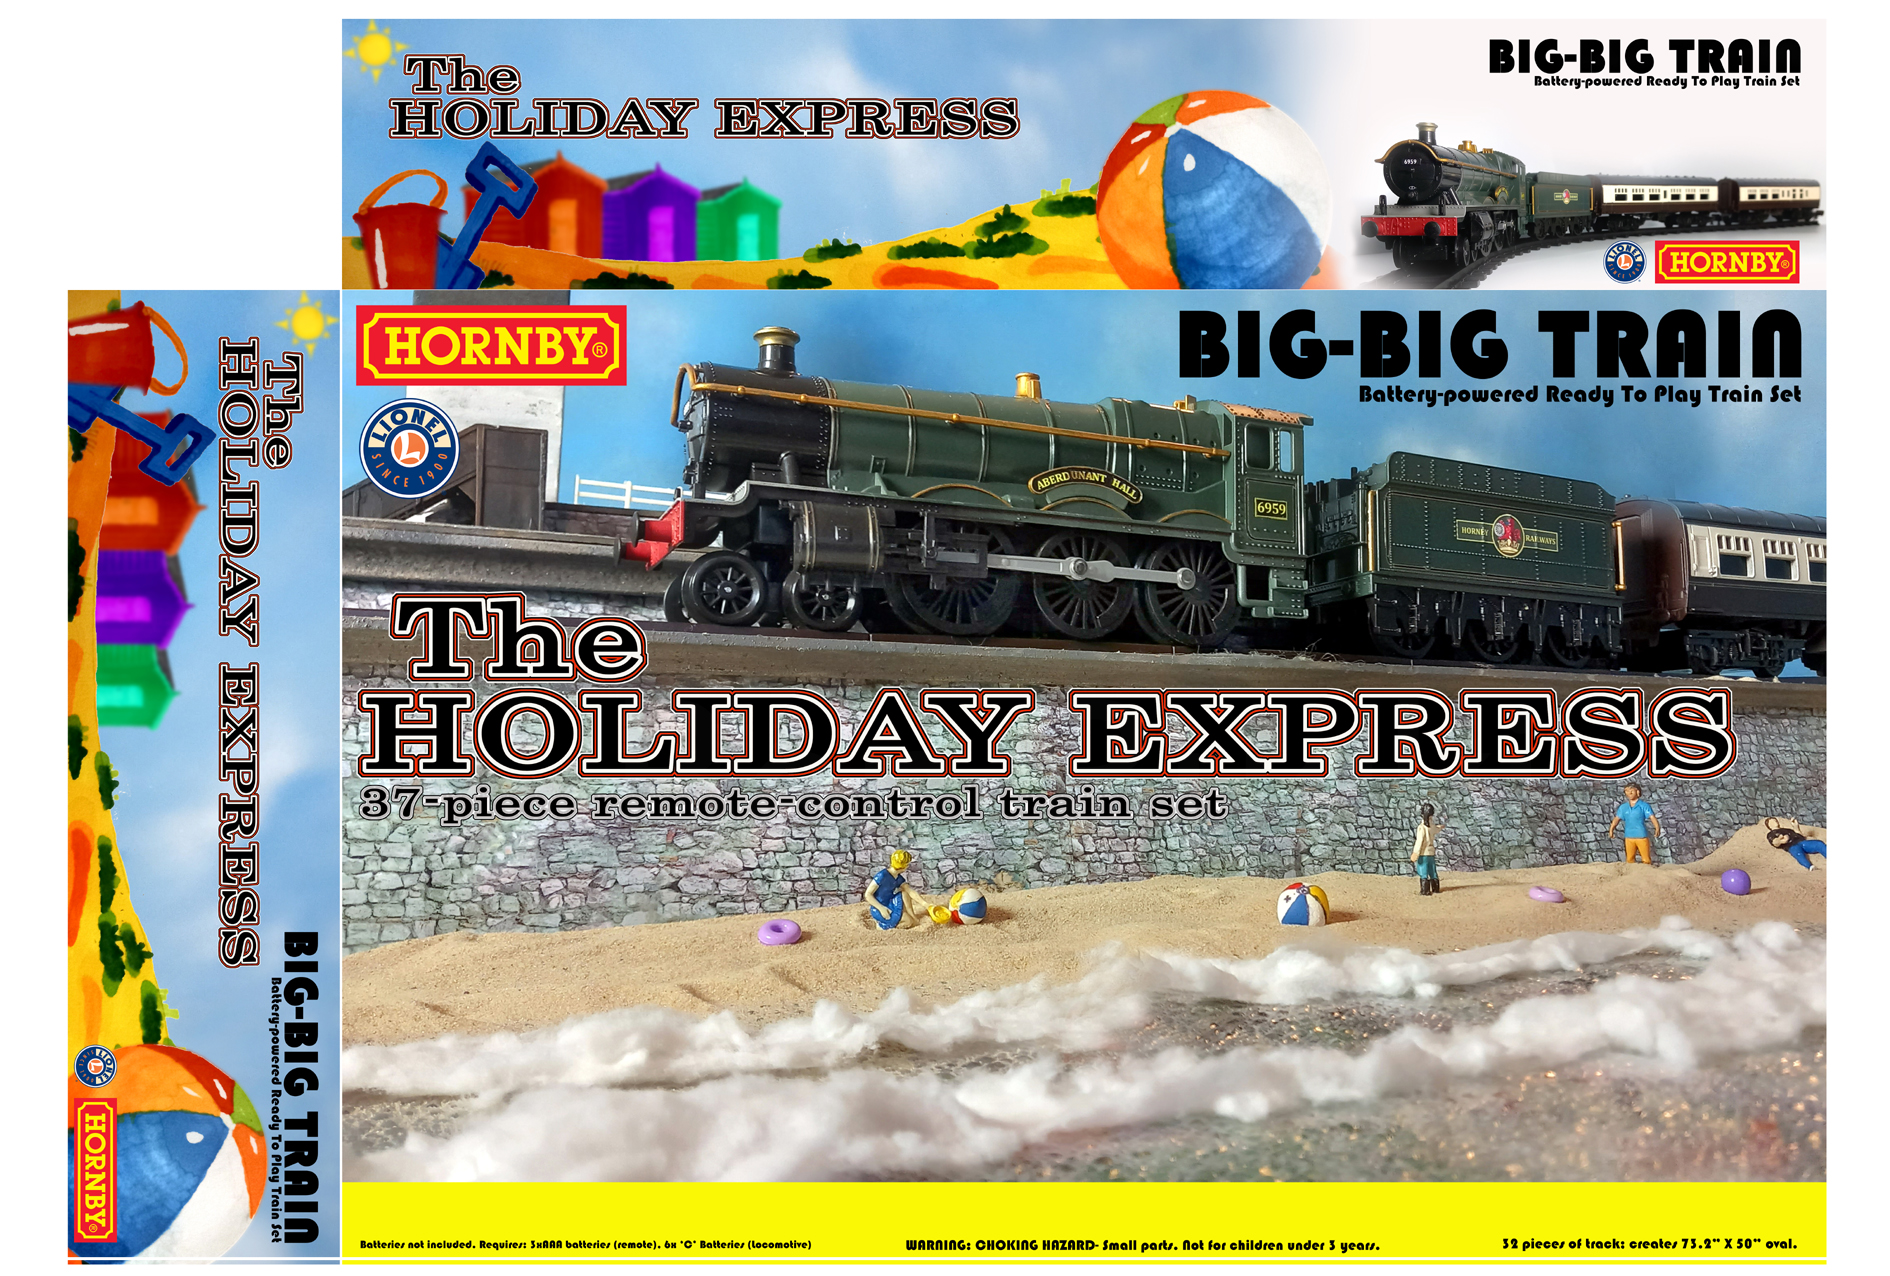
And there's the box art designed and produced (a net, I seem to recall these are called, harking back to my GCSE Graphic Design days). I managed to get it printed on A1 paper...

...cut out...

...and mounted on one of the upcycled boxes, hiding Daniel Radcliffe's earnestly staring face.
The Junior Starter Set
This project needed another location shoot; one of the sets was made to look like a child-friendly train set, but now The Childs are all super-cool teenagers with messy bedrooms bereft of teddybears and such, I was struggling to find a suitable location. Luckily, I had time to fit in a quick shoot at Scouts one night, in the reading corner of the library.

Quickly improvised props; the ball was leftover from the games we did with the younger section that night (thankfully they hadn't managed to burst this one), the teddybear had been used that very evening for "We're Going on a Bear Hunt", the plastic toy animals were in the boot of the car (chairty bag; Tween Child is Too Cool For Toys Now, Gah Get Rid Of Them, etc.) And of course, the legend which is my somewhat-battered cuddly husky, appearing in various photography, art, and sculpture projects since Uni, and still just about intact.

A final location shoot

A very much last-minute attempt to get some more outdoor pics, using the garden railway which badly needs a pass from the weedkiller train. Trouble was, the lighting was poor, and the weather was on the turn, so this didn't turn out too well in the end.

And that was that; out of time for any more shoots.

It worked though, and whilst I probably went a bit over the top doing it, I enjoyed creating the whole fake brand, with all the posters, website pics, catalogues, and other stuff, attempting to keep a cohesive look and design to it all.

Not sure if the editor was expecting it all to come out looking like this, or if he was expecting something a little more 'normal' but there we go (and yep, the Benjy Model Railway Shared Universe in effect here; all the thumbnails in the above shot are other articles I've done for the Collector).

And here it all is, in the Spring issue.


So what next? Well, if the possible house move we're looking into pays off, the eventual plan is a micro layout (of sorts; gauge 2 means even a micro layout is pretty much a major layout). In the meantime these will be used as the main focus of a number of other projects to come over the next year or so, just to make the most of them. And then maybe something a bit more normal for the next piece for Hornby...


